Kamal previously known as MRSK, is a deployment tool that makes it easy to build your
website as docker image and deploy them on to a bare metal or a virtual machine. It takes care of making sure there are
no down time while a new release is created.
Follow the installation guide and install kamal locally. At the time of
this post, the latest version is v1.5.2.
From within your ASP.NET project directory, initialize kamal configuration by running kamal init. This will create few
files. .env, config/deploy.yml, and some sample hooks in ./.kamal folder. Make sure to add .env and files in
.kamal/ directory to your .gitignore and .dockerignore files.
Application dockerfile
A Dockerfile for asp.net mvc application that uses multi-stage builds and asp.net core version 8.0 might look like the
one below.
FROM mcr.microsoft.com/dotnet/sdk:8.0 AS build
WORKDIR /source

# copy csproj and restore as distinct layers
COPY src/ExampleApp/ExampleApp.csproj ./app/ExampleApp/
RUN dotnet restore ./app/ExampleApp

# copy everything else and build app
COPY src/. ./app/
RUN dotnet publish ./app/ExampleApp -c release -o /app --no-restore

# final stage/image
FROM mcr.microsoft.com/dotnet/aspnet:8.0
WORKDIR /app
COPY --from=build /app ./
ENV ASPNETCORE_HTTP_PORTS=5000
EXPOSE 5000
ENTRYPOINT ["dotnet", "ExampleApp.dll"]
You should be able to run docker build -t example-app . and see the project build successfully.
I found that you can get intellisense for the config/deploy.yml file in Rider or VS Code if you add this comment to
the top of the file. There is a pull request to support schema for the file
thats not merged at the time of this post.
# yaml-language-server: $schema=https://raw.githubusercontent.com/kjellberg/mrsk/validate-with-json-schema/lib/mrsk/configuration/schema.yaml
This example configuration file shows how to configure kamal to build and deploy to a ubuntu virtual machine. I am going
to be using a private github container registry to host the docker image.
# Name of your application. Used to uniquely configure containers.
service: example-app

# Name of the container image.
image: chekkan/example-app

# Deploy to these servers.
servers:
  - 77.xx.xx.xxx

volumes:
  - "data-protection-keys:/root/.aspnet/DataProtection-Keys"

# Credentials for your image host.
registry:
  # Specify the registry server, if you're not using Docker Hub
  server: ghcr.io
  username: chekkan
  # Always use an access token rather than real password when possible.
  password:
    - KAMAL_REGISTRY_PASSWORD

# Inject ENV variables into containers (secrets come from .env).
# Remember to run `kamal env push` after making changes!
env:
  secret:
    - CONNECTIONSTRINGS__EXAMPLEAPP
I’ve
generated a Classic Github personal access token
with write:packages permission and have stored it in .env file against the KAMAL_REGISTRY_PASSWORD key. This is
why we won’t be checking in the .env file into our repository or make it available inside the docker container.
I’ve also got another entry for CONNECTIONSTRINGS__EXAMPLEAPP in the .env file for my database connection string.
Notice the volume data-protection-keys that is mounted to the /root/.aspnet/DataProtection-Keys path inside the
container. This will mean that the secrets used by the asp.net application will be persisted between deployments. You
can see the path where docker has created the volume path by running docker volume inspect data-protection-keys. For
me, the mount path is /var/lib/docker/volumes/data-protection-keys/_data. The directory will contain xml files
unique to your application.
So, you don’t have to worry about using the same location for different docker container on the same host.
Traefik is a reverse proxy that runs on your host machine. It manages the traffic
to your container. It also has built in support for generating and managing free
lets encrypt certificates. We can configure this via kamal’s config/deploy.yml file.
# Configure custom arguments for Traefik. Be sure to reboot traefik when you modify it.
traefik:
  options:
    publish:
      - 443:443
      - 8080:8080
    volume:
      - /letsencrypt/acme.json:/letsencrypt/acme.json
  args:
    entrypoints.http.address: ":80"
    entrypoints.https.address: ":443"
    api.dashboard: true
    api.insecure: true
    certificatesResolvers.letsencrypt.acme.email: "harish@chekkan.com"
    certificatesResolvers.letsencrypt.acme.storage: "/letsencrypt/acme.json"
    certificatesResolvers.letsencrypt.acme.httpChallenge: true
    certificatesResolvers.letsencrypt.acme.httpChallenge.entryPoint: "http"
⚠️ Note that you will have to create the file /letsencrypt/acme.json on your host machine with the appropriate
permission.
mkdir -p /letsencrypt && \
	touch /letsencrypt/acme.json && \
	chmod 600 /letsencrypt/acme.json
The acme.json file will be used to store the certificate that was retrieved after succesfull
letsencrypt http challenge. With the configuration
above, we’ve created a certificate resolver called letsencrypt that we can refer to from our application container.
---
labels:
  traefik.http.routers.example-app-web-http.rule: "Host(`example.com`)"
  traefik.http.routers.example-app-web.rule: "Host(`example.com`)"
  traefik.http.routers.example-app-web.tls: true
  traefik.http.routers.example-app-web.tls.certresolver: "letsencrypt"
  traefik.http.routers.example-app-web.tls.domains[0].main: "busynest.org"
  traefik.http.middlewares.httpsredirect.redirectscheme.scheme: "https"
  traefik.http.middlewares.httpsredirect.redirectscheme.permanent: true
  traefik.http.routers.example-app-web-http.middlewares: "httpsredirect"
Container labels are one of the ways traefik can be configured for a given docker container. In the example above, we
are defining 2 routes for the host example.com. One of the route example-app-web is configured for https and the
other one example-app-web-http is for http traffic. We also refer to the letsencrypt certificate resolver for the
https route.
The last thing we are configuring is the
http redirect scheme middleware. We assign the
middleware to the http route example-app-web-http. This will make sure any traffic to the http url will be
redirected to the https port.
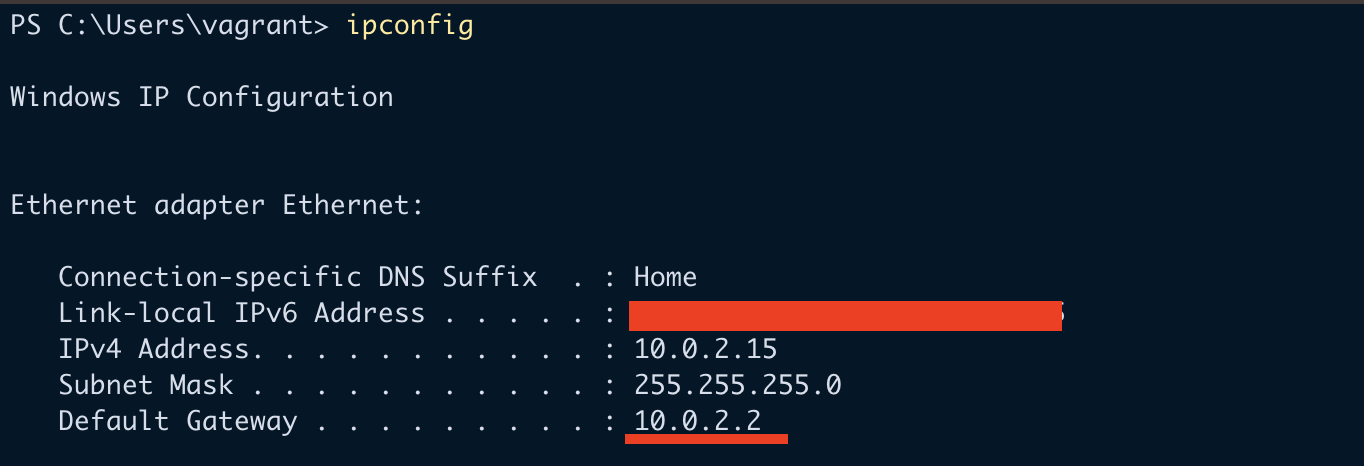
In the above configuration, we’ve also enabled the traefik dashboard which is exposed on port 8080. You can navigate
to the host machine’s ip address followed by the port to view the dashboard after kamal setup.
Kamal requires the container to contain curl command in order to perform healthcheck which enables zero downtime
deployment.
If your asp.net website doesn’t already have
health check middleware,
add the following to your Program.cs file.
var builder = WebApplication.CreateBuilder(args);
builder.Services.AddHealthChecks();
...
var app = builder.Build();
app.MapHealthChecks("/healthz");
This is the minimum you require to have an endpoint at /healthz that returns a HTTP status 200 - OK result when the
server is ready to respond to requests.
In your asp.net dockerfile, add the following entries.
# Dockerfile
RUN apt-get update \
    && apt-get install -y curl \
    && rm -rf /var/lib/apt/lists/*

HEALTHCHECK CMD curl --fail http://localhost:5000/healthz || exit
Then in your ./config/deploy.yml file, add the following…
# Configure a custom healthcheck (default is /up on port 3000)
healthcheck:
  path: /healthz
  port: 5000
  interval: 10s
Manual deployment
Execute the following from your repository root.
This command will ssh into your remote host machine, install and configure docker, push environment configurations,
deploy and configure traefik, build and push docker image to your container registry, and finally run the application
container.
This took a long time for me. But, subsequent deployments were more tolerable.
If you need to make configuration changes to the environment variables or secrets, execute kamal env push, then
git commit those changes, kamal deploy to build and deploy the environment variables to the container. Kamal uses
the git hash to tag your docker image, so if the git commit was same as your previously docker image tag, kamal deploy
won’t build and push the code changes.
Github Workflow / Action
In your CI CD pipeline, you only need to execute the kamal deploy command. Any configuration changes, you can perform
them from your local machine.
Modify ./config/deploy.yml to only build for amd64. This will make the deploy step a bit faster.
builder:
  remote:
    arch: amd64
Create a file for your Github Action. I’ve got a file at .github/workflows/dotnet.yml.
# This workflow will build a .NET project
name: .NET

on:
  push:
    branches: [main]
  pull_request:
    branches: [main]

jobs:
  build: ...
  deploy:
    runs-on: ubuntu-latest
    needs: build
    if: github.ref == 'refs/heads/main'
    steps:
      - name: Set up Ruby
        uses: ruby/setup-ruby@v1
        with:
          ruby-version: "3.3" # Not needed with a .ruby-version file
          bundler-cache: true # runs 'bundle install' and caches installed gems automatically
      - name: install kamal
        run: gem install kamal -v 1.5.2
      - uses: actions/checkout@v4
      - name: Set up Docker Buildx
        uses: docker/setup-buildx-action@v3
      - name: Expose GitHub Runtime for cache
        uses: crazy-max/ghaction-github-runtime@v3
      - uses: webfactory/ssh-agent@v0.9.0
        with:
          ssh-private-key: ${{ secrets.SSH_PRIVATE_KEY }}
      - name: kamal deploy
        run: kamal deploy
        env:
          KAMAL_REGISTRY_PASSWORD: ${{ secrets.GITHUB_TOKEN }}
I’ve skipped section for building the solution.
I make sure to only run the deploy job if the trigger was a push to main branch with the conditional check
if: github.ref == 'refs/heads/main'. We are setting up ruby version 3.3 and using gem install kamal pinned to a
specific version.
When running kamal deploy, all we need is the KAMAL_REGISTRY_PASSWORD variable, which we are assinging the special
value secrets.GITHUB_TOKEN that’s available in our build pipeline made available via github. This token already has
the permission necessary to push to the github container registry. Go ahead and add the secret SSH_PRIVATE_KEY into
your Github repository settings. This will used by kamal to ssh into the machine from Github’s build agent.
Conclusion
It took me a couple of tries to get to this stage. But, I’ve now got 3 side projects running on a single machine all
deployed via kamal costing me just below £10 a month using Hetzner (excluding vms for
database server).
I will write a follow up post if I use anymore capabilities of kamal. Or if I come across any difficulties. The only
problem currently when using kamal for multiple application is that the traefik configuration has to be duplicated
across multiple repositories. Well, it doesn’t have to be in all deploy.yml files. But, I’ve duplicated it.
Its very convinient to just run kamal traefik logs or kamal app logs -f to have visibility into traefik logs and
application logs.
]]>